Suspension springs are a key component of your vehicle’s suspension system, ensuring proper ride height, stability, and comfort. When installed correctly, they absorb road shocks, maintain alignment, and contribute to safe handling. However, mistakes during installation can compromise performance, cause premature wear, and even pose safety risks.
In this guide, we’ll explore the most common installation mistakes made with suspension springs, how they affect your vehicle, and how to avoid them.
Why Proper Installation Matters
Suspension springs support the vehicle’s weight and work together with shock absorbers to control movement. Improper installation can lead to:
-
Uneven ride height
-
Poor handling and stability
-
Increased wear on suspension components
-
Safety hazards during braking or cornering
Common Installation Mistakes
1. Using Incorrect Spring Orientation
Some springs are designed with a specific top and bottom. Installing them upside down can affect fitment and performance.
How to Avoid:
-
Always check manufacturer markings or instructions.
-
Look for end shapes — “pigtail” ends usually face downwards in coil springs.
2. Mixing Old and New Springs
Replacing only one spring (instead of a pair) can cause uneven ride height and handling issues.
How to Avoid:
-
Always replace springs in axle pairs (both front or both rear).
3. Neglecting to Inspect Spring Seats and Mounts
Old or corroded seats can damage new springs and create noise.
How to Avoid:
-
Inspect and replace worn rubber isolators or mounts during installation.
4. Improper Torque on Fasteners
Under- or over-tightening suspension bolts can lead to noise, movement, or even component failure.
How to Avoid:
-
Use a torque wrench and follow manufacturer torque specifications.
5. Skipping Alignment After Installation
Installing springs changes ride height, which can throw off wheel alignment.
How to Avoid:
-
Always perform a full wheel alignment after spring replacement.
Table: Common Mistakes and Their Effects
| Mistake | Consequence | Prevention Tip |
|---|---|---|
| Incorrect orientation | Poor fit, noise, premature wear | Follow installation diagrams |
| Mixing old and new | Uneven ride height, unstable handling | Replace springs in pairs |
| Worn spring seats | Noise, vibration, spring damage | Inspect and replace mounts |
| Wrong torque | Looseness, breakage | Use torque wrench |
| Skipping alignment | Uneven tire wear, pulling | Align after replacement |
Signs of Improper Installation
If you recently replaced springs and notice these symptoms, there may have been an installation error:
-
Vehicle sits unevenly
-
Clunking or creaking noises over bumps
-
Excessive bouncing
-
Uneven tire wear
-
Steering pull or instability
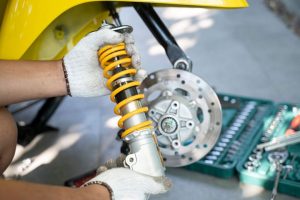
Best Practices for Correct Installation
-
Prepare Properly
-
Gather the correct tools, including spring compressors for coil springs.
-
Wear safety gear — springs store high energy.
-
-
Follow Manufacturer Guidelines
-
Refer to the vehicle’s service manual for specifications.
-
-
Replace in Pairs
-
Ensures balanced handling and consistent ride height.
-
-
Inspect All Related Components
-
Check shocks, mounts, bushings, and control arms.
-
-
Perform Post-Installation Checks
-
Road-test the vehicle for noise or instability.
-
Schedule an alignment.
-
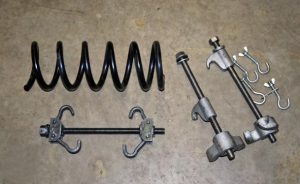
List: Tools You’ll Need for Suspension Spring Installation
-
Spring compressor (for coil springs)
-
Torque wrench
-
Jack and jack stands
-
Socket and wrench set
-
Pry bar (if necessary)
-
Safety gloves and glasses
Final Thoughts
Installing suspension springs correctly is crucial for maintaining your vehicle’s comfort, handling, and safety. Most mistakes stem from rushing the process, using incorrect parts, or neglecting alignment. By following proper installation steps, you can ensure long-lasting performance.
If you need quality replacement springs and accessories, you can Buy Springs & Components online to guarantee durability and compatibility with your vehicle.